Installation of a Zen 50 watermaker on a Lagoon 421
Content
Prolog
On a bluewater yacht, water isn't just a comfort; it's a crucial factor for safety and independence. Especially when sailing for extended periods away from harbors, the topic of watermakers becomes virtually unavoidable. After some research and numerous discussions, we opted for a... Schenker Zen 50 We decided. You can read here how we arrived at this exact model: Watermaker selection.
This article is not about theory, but about practical implementation on board our Lagoon 421 “Joline”The Zen 50 produces around 50 liters of drinking water per hour with moderate power consumption and comparatively low operating pressure. The major sticking point with catamarans is almost always space – and that's precisely what this article is about: How did we integrate the watermaker on board without completely rebuilding everything?
The installation principle is transferable to many boats, but the available space and through-hull fittings are always unique. Our solution is designed to be, above all, different. Lagoon owners and serve as inspiration for owners – not as an installation requirement.
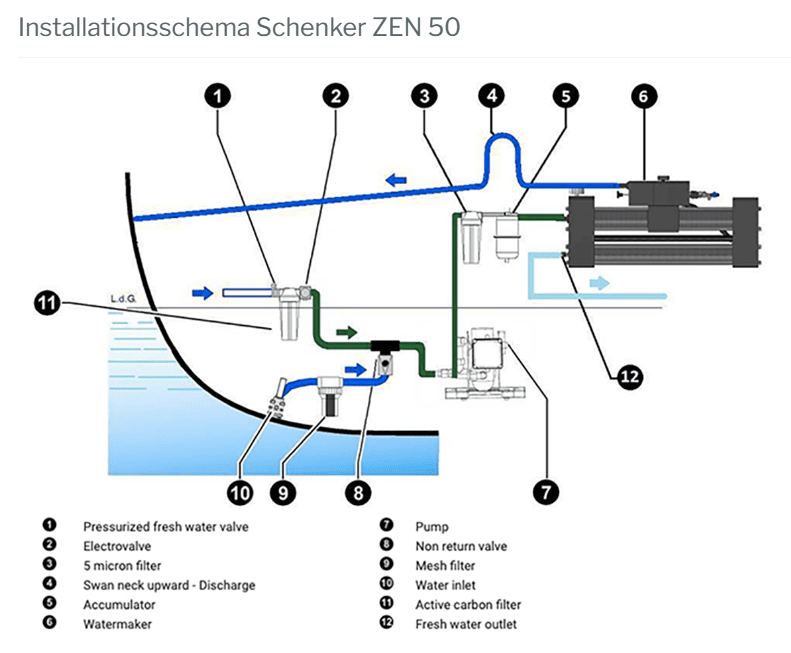
Installation diagram
The basic design of a watermaker is always similar, so I won't go into the general functionality here. This section will focus specifically on the installation of the Schenker Zen 50 on a Lagoon 421 and how we sensibly distributed the individual components within the boat.
Water inlet for the watermaker
The watermaker should be operated via its own through-hull fitting. Several factors must be considered when choosing the inlet point:
- The through-hull fitting must remain securely submerged even when underway and must not draw in air. Therefore, it should not be positioned too far forward, too far aft, or near the water's surface.
- The through-hull fitting should not be located near the toilet outlet.
- The cross-section must be sufficiently large.
- The pump unit should be mounted as close as possible to the water surface and to the through-hull fitting.
In our case, a through-hull fitting for the air conditioning was available in the forward starboard bilge, which we branched off using a T-fitting. We were able to rule out the possibility of operating the air conditioner and watermaker simultaneously for our intended use. From the through-hull fitting, the water passes through the pre-filter and then into the pump unit.
pump unit
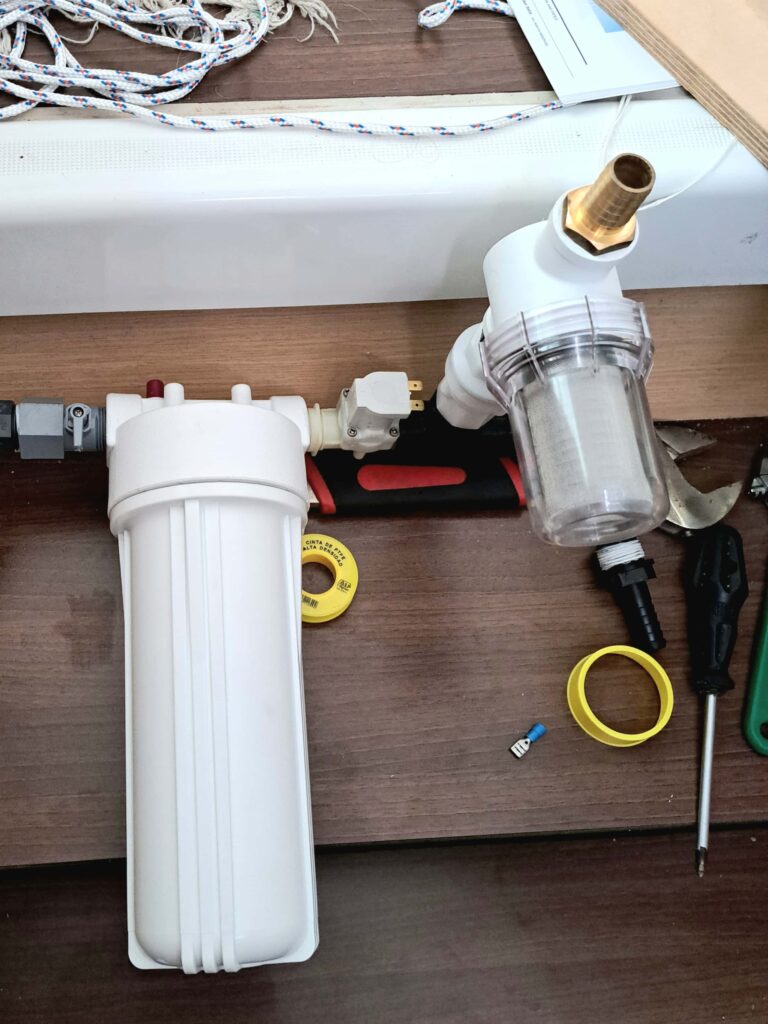
The pump unit builds up the necessary pressure for the watermaker to operate. In the case of the Zen, the operating pressure is only about 6 bar. The pump unit has two pumps, which normally run simultaneously – and for the production of around 50 liters per hour.
The control unit allows the device to be operated by one, the other, or both pumps. This provides a degree of redundancy. The white control cable is simply connected to the control unit using the green connector.
The pump unit requires a 12V power supply, as does the solenoid valve, which is needed for the backwashing process. A water line from the fresh water system to the carbon filter shown in the upper image is also required for the backwashing process.

Central unit with membranes and energy recovery
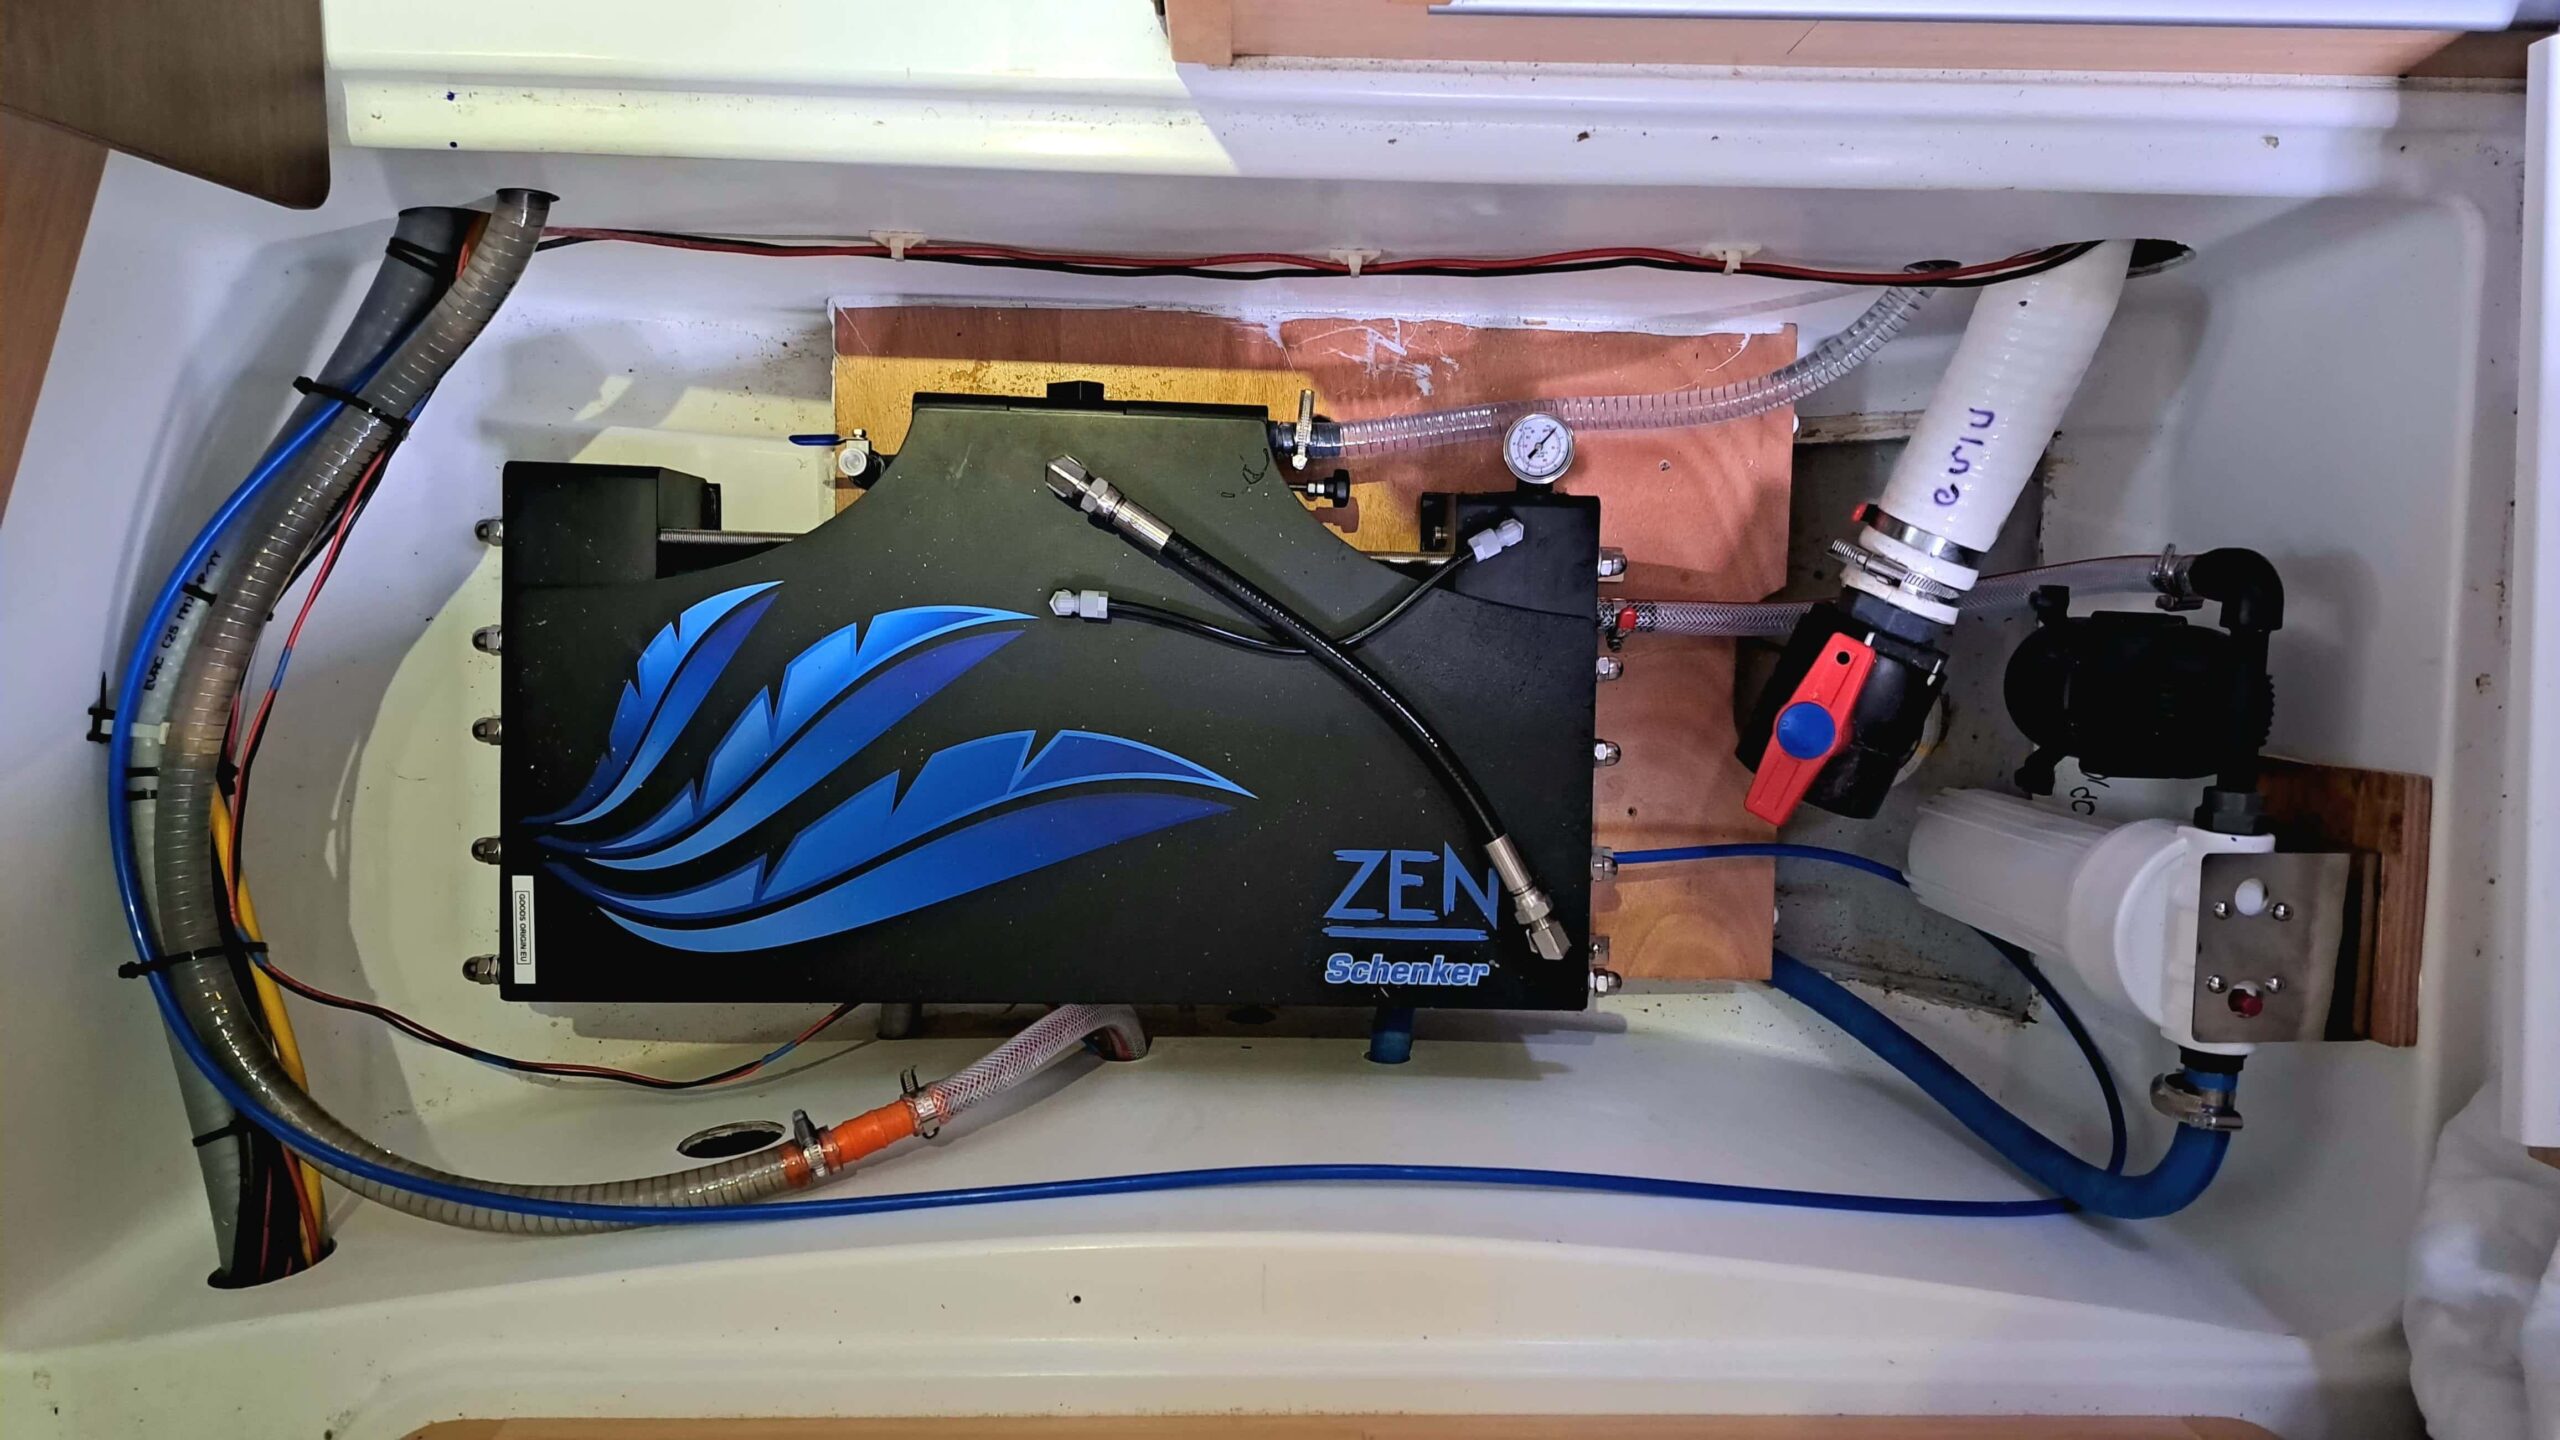
The watermaker's central unit can be mounted horizontally or vertically. In our case, a Lagoon 421, the watermaker fits horizontally in the starboard aft bilge.
For assembly, I fitted a piece of waterproof marine plywood so that the watermaker had a flat and stable base.
The central processing unit requires:
- The water inlet: This is the pipe visible in the center at the bottom. It runs through the fine filter (far right, white housing) and the pressure equalization tank (black container above it) into the unit.
- The product water / drinking water: That's the thin blue hose that comes out to the right of the unit and then runs underneath from right to left. Because of its small diameter, it could easily be laid across the boat. It runs from the starboard bow under the floor to the sink and from there to the port bow. That's where Joline's main water supply is located.
- The wastewater: The remaining water leaving the watermaker is discharged without pressure to the outside. This is the transparent hose that exits the unit at the top right.
Wastewater from the watermaker
We were able to implement the wastewater pipe quite simply and elegantly via the sink drain.

Drinking water outlet & test sampling
The first water produced by the watermaker is not suitable for drinking and must be discarded. Therefore, the product water line requires a three-way valve and an outlet for this initial water. We had an additional tap by the sink, intended for drawing seawater, but we didn't use it.
Depending on the position of the three-way valve, we can direct the water to the outlet at the sink or directly into the tanks.
Connection to the water tanks
The question of how to get the water from the watermaker into our water tanks has occupied me for quite some time.
In principle, you can install a new connection for each tank. We have two water tanks in each hull and would have to run corresponding lines for them. Furthermore, I didn't like the idea of drilling new holes in the existing plastic tanks.
- In the end, we decided to install a T-fitting in the existing connection between the tanks and the pressure pump. This way, the tank that is currently being emptied is always the one being filled. While this might seem like a disadvantage at first glance, we see it as an advantage, since the other tank – regardless of its fill level – represents a predictable reserve.
Overview of materials and components
For the installation of the Schenker Zen 50 on board our Lagoon 421, we used the following main components. This list is not a complete list of materials, but it provides a good overview of the most important parts:
- Schenker Zen 50 Watermaker including pump unit, central unit and control unit
- through-hull fitting (existing air conditioning inlet, branched off via T-piece)
- Pre-filter unit with coarse filter and fine filter for seawater
- magnetic valve and carbon filter for the automatic rinsing process with fresh water
- 12V power supply for pump unit and valves, including fuses and suitable cable cross-sections
- surge tank in the approach to the central unit
- Product water line (thin hose) from the watermaker to the sink and on to the central water supply
- Three-way tap for switching between test sampling at the sink and filling the water tanks
- Tee in the supply line to the pressure water pump, in order to feed the product water into the existing water tanks
Depending on the boat type and existing installation, the details can vary significantly. It is important to keep the distances short, plan the cable routing logically, and allow sufficient access for maintenance and filter changes.
Production of drinking water with the watermaker
Our drinking water production cycle is as follows:
- Position the three-way valve towards the drinking water outlet / test outlet.
- Turn on the watermaker.
- Let the water run for a few minutes and then test the quality. We do a very practical smell and taste test, but we also have a suitable testing device.
- Switching the three-way valve to filling the water tanks.
- When the tanks are full or enough water has been produced, switch off the watermaker. The Zen will automatically flush with fresh water and then shut down.
- Optional: Filling drinking water bottles at the tap. We've gotten into the habit of taking our drinking water directly from the watermaker and not going through the tanks. This way, we always have fresh and tasty water and don't have to think about further purification steps.
Experiences in the workplace & conclusion
After the first few months of operation, the Zen 50 has proven to be exactly the right choice for us. With a capacity of around 50 liters per hour and a comparatively low operating pressure, the watermaker integrates well into our energy system. We typically run it when there is sufficient solar power available or when the generator is already running.
It was especially important to us that all components easily accessible The pre-filter, carbon filter, solenoid valve, and central unit can be maintained without much effort. The decision to drain the wastewater via the sink and direct the product water via the three-way valve either to the sink or into the tanks has proven to be very practical.
One point we would make to everyone: Plan and draw as much as possible in advance. Before laying the first hose, it's a good idea to plan out the routing of pipes, cables, fuses, and potential leak points on paper. This will save you time and hassle later.
Our conclusion: The Schenker Zen 50 is a very interesting option for a Lagoon 421 and similar bluewater catamarans. It's not the cheapest watermaker on the market, but it offers sophisticated technology, energy recovery, and sufficient installation flexibility. For us, it was a step towards true independence – and we would install it the same way again.


Leave a comment
You might like it too...